Think the whole wheat sandwich bread you buy at the grocery store is actually wholesome? Wellll, it might not be as healthy as you think it is. I thought mine was a good buy until I looked at the ingredients list last night, a full 20 involved:
- Whole wheat flour
- Water
- Sugar
- Wheat Gluten
- Yeast
- Raisin juice concentrate (what the…?)
- Wheat Bran
- Molasses
- Soybean oil
- Salt
- Monoglycerides
- Calcium proprionate
- Calcium sulfate
- Datem
- Grain Vinegar
- Citric acid
- Soy lecithin
- Whey
- Soy flour
- Nonfat milk
Sounds like a whole lot of stuff that doesn’t need to be in there, and far more sugary stuff than necessary!
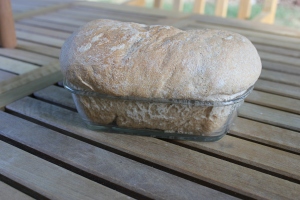
First loaf of homemade Grandmother Bread
I made a few loaves of homemade sandwich bread last year for my Nothing Boxed Project, and after reading the label on my store-bought loaf I will definitely be baking all my own bread from here on out! I love the Grandmother Bread recipe from Suzanne McMinn who blogs at Chickens In the Road. It’s incredibly simple, doesn’t take too long and tastes AMAZING. Nothing beats punching down a warm, yeast-y ball of dough after it’s risen.
The first few times I made her recipe I used 1/2 whole wheat flour and 1/2 white flour. That was before I learned about staying away from simple carbs and white flour to manage my blood sugar, which can aggravate anxiety when it spikes. When I made two loaves yesterday, I did an experiment: one loaf was made of 3/4 whole wheat and 1/4 white flour; the other loaf was made with 100% whole wheat flour. I wanted to see if there would be an appreciable difference in the taste and texture depending on the two loaves. My entire family did a taste test and we determined there wasn’t much of a difference. So, I’ll be making my own whole wheat Grandmother Bread for toast and sandwiches!
Here’s my adaptation of Suzanne McMinn’s Grandmother Bread recipe. It makes two loaves, so if you just want one, halve the ingredients. Note that there’s only 5, not 20. Ha!
3 cups warm water (or whey from making your own cheese!)
1 tablespoon yeast (1 packet)
1 teaspoon salt
1/4 cup sugar (this is to feed the yeast; the bread is not sweet)
6-8 cups whole wheat flour
- In a very large bowl, add together the water, yeast, salt and sugar. Stir, then let sit for 5-10 minutes.
- Using a big, stiff spoon add the flour one cup at a time until it becomes very hard to stir.
- Ball your hands into fists and gently press in with your knuckles while adding flour; this keeps your hands from getting all sticky. As you add more flour, the stickiness will subside. You can then knead normally.
- Add flour a little bit at a time until it looks and feels like you couldn’t possibly add any more. Trust me, you’ll know!
- Knead another 3-7 minutes depending on your mood, then pat it into a globe-shaped ball.
- Grease a medium size bowl (preferably with 1-2 tablespoons of olive oil) and put your ball of dough into it. I like to smooth a bit of olive oil over the top of it. I have no idea if this does anything; it just feels right to me. Cover the bowl with a clean towel or sheet of waxed paper.
- Let the dough rise for 60-90 minutes until it’s way bigger than it was when you put it in the bowl. Then, knead it for a good 5-10 minutes.
- After that, split it into two smaller loaves. Grease 2 loaf pans, put one loaf in each, cover, and let rise another 60-90 minutes until they look like “real” loaves!
- Bake for 20-25 minutes at 350F – 375F.
- Eat. YUM!
Variations: My next experiments will be using honey instead of sugar and kneading fresh rosemary into the dough.